Showing posts with label Christmas. Show all posts

Thursday, April 16, 2015

Green Eggs and Easter Ham

This has become a tried and true recipe in our house. I used this recipe for the first time three years ago when I made my first Easter dinner and my first ham. My husband and I loved the recipe so much that I've never used any other ham glaze. He says it's a tradition now and that Easter isn't complete without my ham. The man loves me and my cooking :)

I realized when preparing this years Easter ham that I haven't shared this awesome recipe with all of you yet! So if you're looking for an awesome ham recipe, this is IT!

To make the glaze you'll need:
- a bowl to mix it in
- a liquid measuring cup
- a basting brush
- 1/3 measuring cup
- 1 Tablespoon
- 1 teaspoon

The glaze ingredients:
(1 Bone-in Ham)
- Dijon Mustard
- Balsamic Vinegar
- Brown Sugar
- Black Pepper
- Rosemary
- White Wine or Champagne
(We don't include the alcohol, as there are some family members that don't like alcohol.)
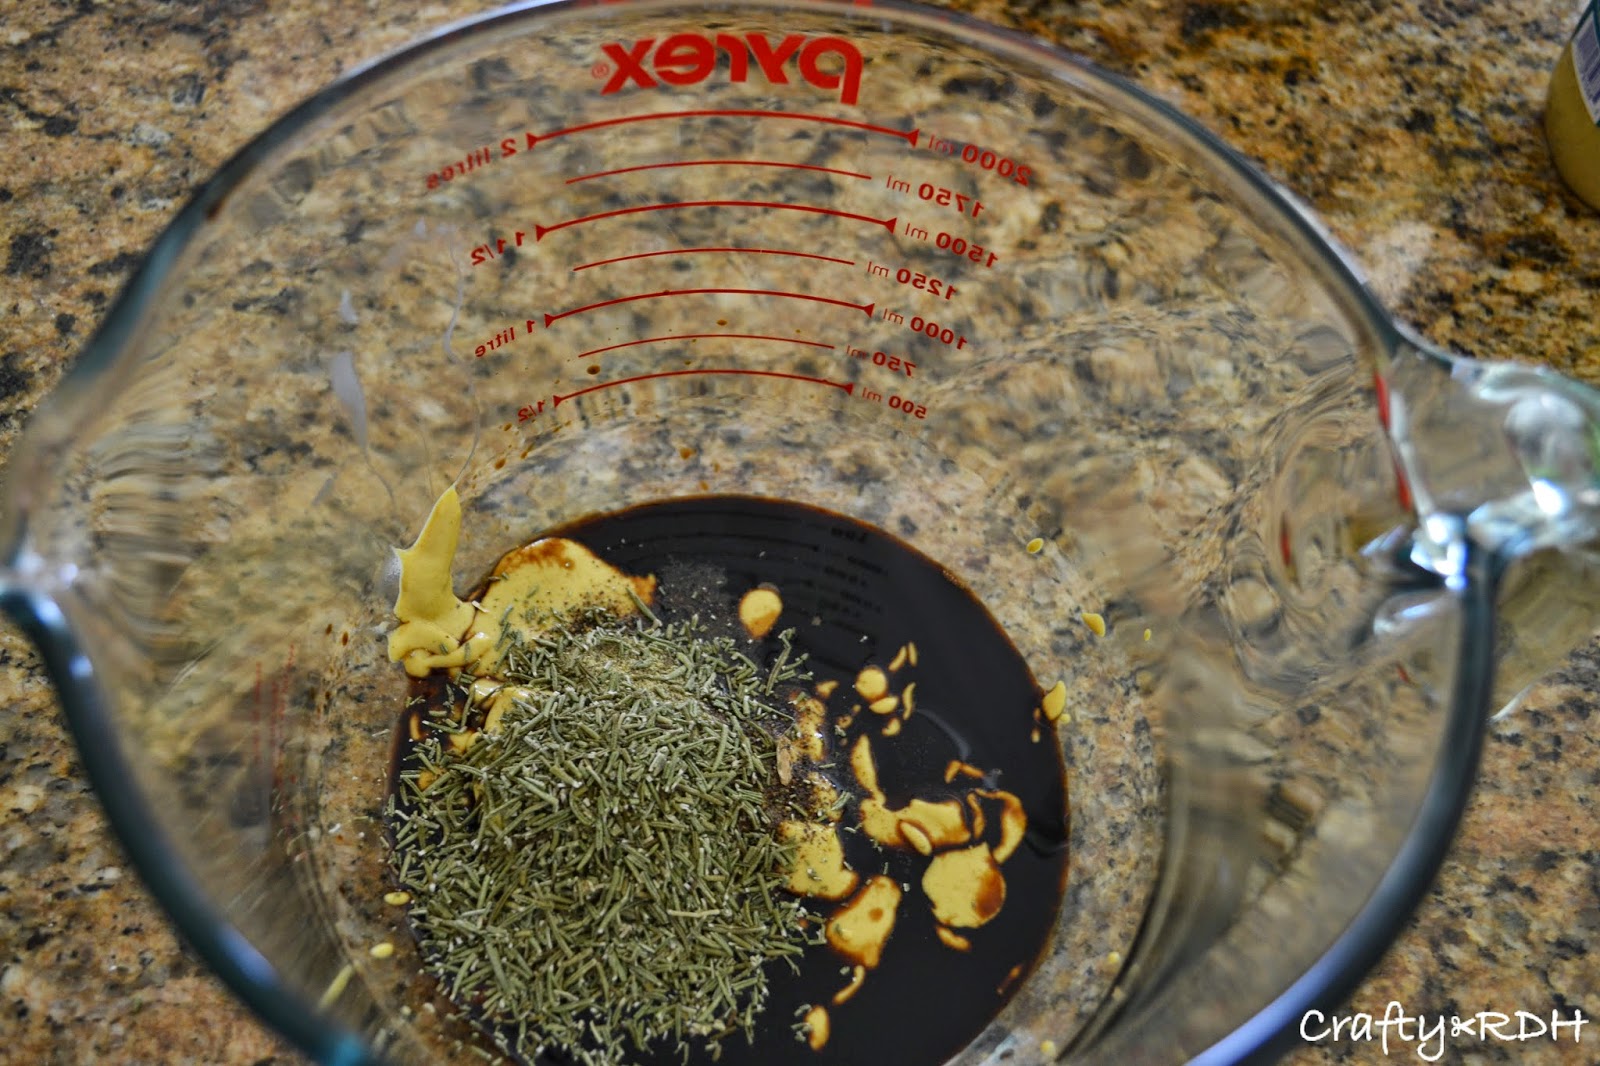
Combine all ingredients, except the alcohol.
If you're going to include alcohol in the recipe it goes in later.

1/3 cup brown sugar

Add 3 Tablespoons Balsamic Vinegar

Add 3 Tablespoons Dijon Mustard

Add 1 teaspoon Black Pepper

My mortar and pestle comes in handy to crush rosemary!

Add 1 Tablespoon crushed rosemary

Next, mix the ingredients together.


Seriously the BEST glaze EVER!

Cook the ham according to package directions. Basting it periodically while it cooks.
This year we used a spiral cut but other hams will need to be scored before basting and cooking.

Enjoy this wonderful ham for next Easter or an occasion!
We sure do!

Happy Crafting!

Thursday, January 22, 2015

Christmas Album - An Organized Way To Save Christmas Cards

Now that Christmas is over, I'm trying to get the house reorganized after all the Christmas chaos. Part of my organizing is to figure out what to do with the Christmas cards. I'm sure most people just throw the cards away each year. However, I'm very sentimental and I save all of our Christmas cards. Previous Christmas cards have gone into a drawer but this year I decided I wanted to do something more with them. So I decided to make a Christmas album...

Here are some of 2014's Christmas cards.
My Christmas album idea came from wanting to be able to look back
at previous cards and see how everyone has changed and families have grown.


I found this beautiful photo album on sale and
 it has been waiting to be filled with pictures.


Previous Christmas cards have been pulled out of their drawer
and are now nicely organized in our Christmas album.
Here's to 2015!


Happy Crafting!

Tuesday, December 30, 2014

Glass Etching

Are you looking for a nice Christmas present without spending a ton of money? Well look no further! I have been stocking up on these wonderful Glade candles for about $0.25 a piece! Yes, you read that correctly! How did I get these so cheap you ask? Coupons, Ibotta, and Checkout 51 of course! Not sure what those are? Check out my post about saving money here.

I decided to glass etch these for friends with their initial this year for Christmas.

Supplies Needed:
Latex/Non-Latex Gloves,
Etching Cream,
Brush,
Rubbing Alcohol,
Cling Stencils 

Clean glass with rubbing alcohol, allow to dry, and place stencil on glass.
Apply etching cream with brush (a decently thick layer) and leave on for 15 minutes.
Rinse off cream and remove stencil.

Voila!
A great present without spending a ton of money!

Happy Crafting!

Tuesday, December 2, 2014

Christmas 201?

Nothing beats saving money especially during the holidays! This was an accidental money saver... I decided this year that I wanted to do something different for our Christmas cards and chose Christmas postcards. I found the style I liked but it said Merry Christmas 2012 (pictured below). I called the company (who shall remain nameless) to find out if this is the way they would come of if they would say 2014. The company explained that they had not updated their website, that I was not the first one to ask about this and that the postcards would indeed say 2014.


Before

You can imagine my irritation when they arrived in the mail saying Merry Christmas 2012! I called the company and voiced my frustration over the fact that I had called and was told the date would be correct. They refunded me my money and told me to order different cards because they could not figure out how to change the template to the correct date. I went back and looked at all of the cards and didn't like any over my other choices. So here's what I did....


After

I found Christmas stickers that covered the error! Their error was my savings... all I had to pay for were the stickers (and postage).

P.S. My cards went out in the mail today and for those that are receiving one of our cards, I apologize for the glitter from my cute stickers that goes EVERYWHERE!


Merry Christmas everyone!

Saturday, October 25, 2014

Star Light, Star Bright

 This knitted star or snowflake (depending on your interpretation) is part of a larger project I'm working on for a dear friend. You can find the pattern for this star/snowflake here. I also think in the right colors this would make a cute sea star. I love the color variegated yarn with most of my projects. If you've visited my blog before I'm sure you're aware! I especially love it for this star because no two stars in the sky are the same and with variegated yarn the knitted stars won't be either!

I have to say that I'm quite proud of this star. Mainly because it is the first time I have successfully used double pointed knitting needles. Thank you to my mother-in-law for her help with that! On a side note, I LOVE having common interests with my mother-in-law and am eternally grateful for our wonderful relationship!

Here is the start of the body of the star.
I apologize for not taking any further pictures of the body portion!


The points of the star were what I found confusing and thought how helpful it would be to have pictures to go along with it. So I made sure to take pictures of each row as I went along. I hope you find them helpful in knitting your own star!


Here are four completed points out of six
(the stitches on each double pointed needle makes two points).

Pre-row 1 - This row is done before row 1  to prepare the start of the point.

The preparation of the pre-row divided the stitches onto two double pointed needles.

Row 1 - The first point will be worked with the right needle (worked back and forth).

Row 2 - My S2, K1, PSSO and SSK tutorials will come later down the line.

Row 3 - To be honest I couldn't figure out how to P2 Tog TBL
(normally I would google a knitting technique I'm unfamiliar with but I wasn't home)
so I just P2 Tog. Personally I don't see a difference in the pattern.

Row 4 - K3Tog and SSSK are done in the same fashion as K2Tog and SSK,
except with 3 stitches instead of  2.

Row 5 - Simply purl

Row 6

Row 7

Row 8

All that's left is to weave in the ends and steam iron it flat!

Moving on to new stars...
Happy Crafting!

Sunday, December 29, 2013

Easy Blanket: Blanket (Not a Scarf) for Christmas

I realize that a blanket is not a scarf but since 8 months old is a bit too young for a scarf M gets a blanket instead. This blanket has been made over many months and in between many scarves. I started the blanket about October. 

Having knit this pattern before I confidently got my needles out to start knitting. After a few rows it wasn't looking the same as the previous blanket. It looked "holey". I know what you're thinking and yes they were the same knitting needles I used previously and the same brand and type of yarn. The only difference is the color of the yarn. Being the perfectionist that I am (at least when it comes to knitting) and not liking the way it looked I undid all the the knitting even though my husband and mother insisted that it was fine. I moved to a needle size smaller but do to the needle change I no longer had enough yarn. This didn't dawn on me until further along in the blanket. I originally bought this yarn (2 skeins) on sale at Hobby Lobby. I bought 2 skeins because that's what I used for the previous blanket I had made with this pattern. Of course when I went back to buy more they no longer sold it and I had to get more online for a higher price. But finishing the blanket was worth the higher price of yarn! 

I found the original pattern on Ravelry. Hopefully it will help keep M nice and warm this winter!


Happy Crafting!

Sunday, December 22, 2013

Welted Scarf: Scarves for Christmas

Here is another unique scarf in my Scarves for Christmas collection. I found this pattern on Pinterest of course! I picked this yarn for B long before I chose a pattern. I kept debating between a few patterns until I found this one and I knew it was perfect (hopefully!).

It took a bit of internet research to clarify how to do the welts but once I got the hang of it, it's simple! I live this because it's not a set pattern and each welted scarf you make will look different! 

How to make a welt:
The scarf is knit in stockinette stitch with the welts being made on the purl side. 
To begin knit a few rows in stockinette stitch (the pattern suggests 5 rows). On the purl side 
pick up a purl stitch with your right needle and transfer it to your left needle. Now knit both the transfered stitch and regular stitch together. Continue this to make your welt. For this first welt do it across the entire row (the same for your ending row to make it uniform).

It is recommended to make your welt at least 6 stitches wide otherwise it looks odd. After my first welt I changed how mant rows I used to welt together (changing from 5 to 3-4). I didn't like the way the large welt looked.

To make the scarf more interesting I varied where I placed the wekts, how long they were, as well as how wide. Some started out wider and got smaller; giving it a horizontal look. Some rows started and ended with welts. 

All in all I love the way it turned out!  I haven't knit a scarf yet I haven't liked... probably because if I didn't like it to begin with I would take it out and start again!

Now that you know the basics of welting go out and knit welts!
Happy Crafting!
The pattern can be found here.

Saturday, December 14, 2013

Claudette Crochete Scarf: Scarves for Christmas

This  was a very exciting scarf for me... first because this was the very last scarf on my to do list and second because it is the first thing I have crocheted besides a square. 

I was amazed at how fast this scarf went! It was done within a matter of days. Crocheting a scarf was interesting because you start by chaining the length and then crocheting the width. I normally knit which is starting with the width and knitting the length. The only bad thing about this was that when I ran out of yarn I couldn't just end the scarf there because the row wasn't complete.

You can find the pattern here
The only thing I did different from the pattern was add an extra row because I wanted it to be wider.


Merry Christmas and happy crafting!

DIY Christmas

We all want a perfect Christmas... the perfect party, outfit, treats, decorations, and of course the perfect gift. Whether money is tight or you just want to add a personal touch to the holidays! Here is my DIY Christmas guide for all you!

Here is the perfect gift for your white elephant party 
or just for a funny Christmas gift!


Family or friends coming over for a visit?
Serve them some homemade chai tea!


O'Henry bars would go great with your chai or to give as a gift!
Homemade peanut butter cups are a great addition to any holiday party!

Can't find the perfect Christmas tree skirt? Neither could I! 
Why not make one?! It will add the perfect touch to your tree!

Your front door is a little empty without a great wreath!
This one is thin and easy to store!

Make Christmas memorable by making ornaments with the kids!
Turn this candy cane ornament upside down for a J to remind you that
 Jesus is the reason for the season!


Make your child a new buddy with this sock monkey!

This reusable swiffer duster is a great gift for any friend or family member!
When you're done cleaning just simply toss it is the wash and it's ready for the next time!


Your crafty friends will LOVE a thread holder! I sure do love mine!
Make this fabulous memo board for a unique gift or to help keep your Christmas organized. 
Make it your own to go with any decor. I guarantee you won't find another one like it!


Happy Christmas Crafting!