Showing posts with label Sewing. Show all posts

Thursday, February 13, 2014

Finished Pajama Bottoms

Finally! Some of you might remember that I started a pair of pjs bottoms last year with the promise of updating when I finished them. Well guess what?! I finally did! I stopped working on them, having the sides all sown and needing to do the casing for the draw string. 

Originally I was just planning on folding, ironing, and sewing the top of the pants to make the casing but I didn't like how low cut that would make them (my first obstacle). I don't know about all of you but I like to be comfy when I sleep and low rise pj bottoms is not my idea of comfy!

My second obstacle being that I could not get my buttonhole feature to work correctly on my sewing machine. I kept trying on scrap fabric with no luck! It would just sew in one spot and not move and finally would get bunched up in the machine. 

I've had my sewing machine since I was a kid and between about 5 moves I have no clue where the manual is. The company has some out of print manuals online but of course not one for my machine. So my pjs bottoms went into a basket where they have been for many months now, with good intentions of finishing them. 

Since my favorite pjs bottoms (aka old, comfy, and falling apart) are pretty much beyond repair (I've already sewn up tears a few times) I decided that it was time to finish my in progress pjs. My solution to the obstacles was first to use extra material to make a casing for the drawstring and to use my mother's sewing machine to do the button holes. As long as her machine was set up I used it to hem my pj bottoms as well. It was great to use her machine because it's fairly new and buttonholes are a synch and it has fancy stitches.


Happy Crafting!

Saturday, December 14, 2013

DIY Christmas

We all want a perfect Christmas... the perfect party, outfit, treats, decorations, and of course the perfect gift. Whether money is tight or you just want to add a personal touch to the holidays! Here is my DIY Christmas guide for all you!

Here is the perfect gift for your white elephant party 
or just for a funny Christmas gift!


Family or friends coming over for a visit?
Serve them some homemade chai tea!


O'Henry bars would go great with your chai or to give as a gift!
Homemade peanut butter cups are a great addition to any holiday party!

Can't find the perfect Christmas tree skirt? Neither could I! 
Why not make one?! It will add the perfect touch to your tree!

Your front door is a little empty without a great wreath!
This one is thin and easy to store!

Make Christmas memorable by making ornaments with the kids!
Turn this candy cane ornament upside down for a J to remind you that
 Jesus is the reason for the season!


Make your child a new buddy with this sock monkey!

This reusable swiffer duster is a great gift for any friend or family member!
When you're done cleaning just simply toss it is the wash and it's ready for the next time!


Your crafty friends will LOVE a thread holder! I sure do love mine!
Make this fabulous memo board for a unique gift or to help keep your Christmas organized. 
Make it your own to go with any decor. I guarantee you won't find another one like it!


Happy Christmas Crafting!


Thursday, November 14, 2013

Darn Socks

Tired of throwing out perfectly good socks because of one small hole? So is my husband lol! This is one of the ways he has changed me for the better (hopefully most agree). Before my husband's influence these socks would have been tossed in the trash without a second thought. It would have been a great excuse to go shopping.

 I tried this early in our marriage and if I'm not careful the socks will walk themselves out of the trash. I've learned that if the hole is small enough to sew or patch it and if the hole is big enough I wait to throw it out on trash day after my husband has left for work! 

The holey socks.

These socks sent me searching the internet about how to properly darn socks. Which made me discover this amazing thing called a darning egg. A darning egg is placed inside the sock you are fixing. It allows you to give more of a proper shape to the sock, as well as to ensure you don't sew the front and back of the sock together. I'm adding a darning egg to my Christmas wish list. I'm sure it will come in very handy in the future of darning my husband's socks.


Until I get a true darning egg I'm using a plastic Easter egg.
It was just laying around the house and it worked!

Pinch the sock together a bit...

and insert of needle on the farthest side of the hole.

Sewing back and forth pulling tight to close the hole.

It doesn't look perfect but not bad for my first sock!

Happy Crafting!

Thursday, October 31, 2013

Halloween Crafts

Does your Halloween party lacking something? It's not to late to make your own Halloween crafts! 

Make your own unique Bean Bags!


Accessorize your outfit with a great bracelet!
Create a fantastic face mask for Trick or Treating!

Happy Crafting!


Tuesday, October 1, 2013

Homemade Heating Pad

For those of you who are unaware October is Pregnancy and Infant Loss Awareness month. It is even more significant to me this year because I just miscarried our third child. I want to share with you a homemade heating pad I made a few years ago. While only God can help to ease the emotional pain of miscarriage the heating pad has helped me tremendously with the physical pain.

The heating pad was very easy to make. I took some extra fabric that was lying around my craft room. Cutting two symmetrical pieces and sewing, with wrong sides together, three of the four sides. I filled mine with oats about half way full. You can also use rice or add essential oils for aromatherapy. After filling it, sew up the remaining side and you're done!

Heat in the microwave and place on any sore area. There are many possibilities to tweak this craft. I'm thinking a smaller version to fit in your pockets during winter would be great!

Happy crafting! 

Here is a picture of my homemade heating pad. Best thing I've ever made!

Wednesday, July 17, 2013

Mending

At times like this I am so thankful to have the space in our house for a dedicated craft room. It makes it so much easier for me to sew and craft. I don't have to lug out my sewing machine every time I want to do something. My sewing machine has it's own permanent spot on my desk!

Last week I decided to wear a top I hadn't worn in a while. When I put it on I discovered the majority of the hem had come undone. Because I had already decided that was the shirt I wanted to wear and my sewing machine is set up I went into my craft room to sew a new hem.


Since I didn't have thread that matched exactly I chose a contrasting color and sewed a zigzag hem for some flair. Even though the hem around the sleeves were fine I also sewed zigzag over the hem so it would all match. I love that my plain shirt has some extra flair now!


The hem on my tank top had also come out so I sewed a matching hem into that one as well. I love that I have enough craftiness in me to fix the hem instead of just getting rid of the shirt!
Happy Crafting!

Thursday, June 13, 2013

Remake Favorite T-Shirt

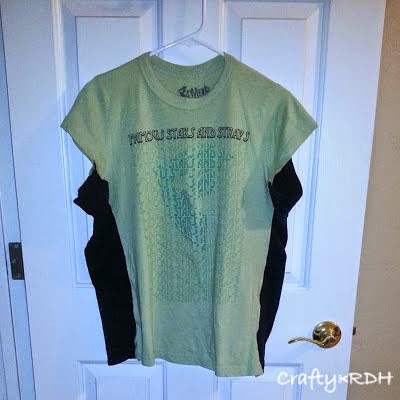
We all have an old favorite shirt that no matter how many times we clean out our closet we just can't seem to get rid of... the green Famous Stars and Straps is mine. When I was a teenager I wore things much tighter then I do now. My favorite shirt no longer fits comfortably but no matter how many times I've purged clothes out of my closet, my favorite shirt always remains.


A few months ago one of the straps broke on a tank top broke. I put it in my mending pile but never got around to it. Mainly because the straps are spaghetti strap and I wasn't sure if it would hold. It has sat around in my craft room the last few months and pinterest inspired me to combine the two shirts to make one new shirt that fits comfortably!


Old tank top
+

Favorite T-shirt

= New Comfy Shirt

Step 1: Take a shirt you own that fits comfortably and measure to figure out how much material you want to add.

Step 2: Seam rip the side seams of your old shirt and cut the appropriate amount of fabric from your tank top (including the new seam allowance). I kept the original bottom hems of both shirts to make things easier. The hems didn't quite match up but you can only tell if you look closely.

Step 3: Pin the tank top pieces to the shirt, sewing a straight seam closest to the edge and a zigzag after that (if you have a serger machine you can use that instead of the zigzag stitch).

Step 4: I used material some of the extra tank top material to add it into the sleeve area.

I love the end result and having my new favorite shirt back! 
Happy crafting!

Wednesday, February 27, 2013

Self-Healing Cutting Mat

Sitting in my craft room starring at my self-healing cutting mat that sits next to my sewing machine. Wishing that our hearts could heal the same way that mat can!
My grandfather passed away in December and I'm missing extra today. Happy 90th birthday Grandpa! Give my baby girl a big hug for me! Waiting for the day that we're all reunited in heaven!


Measure Twice, Cut Once (Pajama Bottoms)

I am currently working on sewing some new pajama bottoms for myself. After going back to my usual store where I've been getting my pajama bottoms from for years I found that they have started cutting the size a bit smaller then before and their pj bottoms are no longer comfy like they used to be. I like my pajama pants to be baggy and comfy... something I can lounge around in on Saturdays with my husband or on my day off while I work on cleaning the house. I also like my pajamas to be cute. Since I couldn't find anything that I liked I decided to make my own. I decided on a fun pattern of green fabric with hot pink polka dots (I LOVE polka dots!!!) and a hot pink ribbon for a draw string.

I've washed the fabric, which is a must before any sewing project! Fabric might shrink a little when washed so be sure to pre-wash before sewing. It would be horrible if your garment was to shrink after all your hard work, when it can all be avoided by pre-washing your fabric.

After washing the fabric I cut out the pattern and pinned it to my fabric. This is my least favorite part of it all! For all of my craftiness I cannot cut straight to save my life! Thankfully my newest addition to my craft room (cutting mat, rotary cutter, and ruler) made this hated step bearable for me! Hard to believe that I have lived without a cutting mat and rotary cutter for SO long!

Next comes pinning and I'm not talking about pinterest! ;) Simple enough align the front pieces to the back pieces, pin together, and then begin sewing! This is where I am right now so I'm signing off for now so I can start sewing. I'll update to show you the pajama bottoms when I'm done.

Happy crafting!


Tuesday, January 29, 2013

Christmas tree skirt

Since I feel I am a fairly crafty person I decided that I needed to make us our own Christmas tree skirt. I found a pattern I loved from Joann's Fabrics. I LOVE polka dots and thought this would be great but it didn't seem very Christmasy so I decided to make ours with more Christmas "appropriate" colors. I also didn't like the way they put it together. I wanted to make something that was going to last, that would be our Christmas tree skirt for years to come. So I decided to sew everything together.

This project was a bit daunting for me. I started by borrowing my parents Christmas tree skirt to use as a template to cut the base for our skirt. I used round metal cookie sheets and scrapbook stencils and chalk to cut the circles. I chose a wavy stitch to sew everything together in red thread. I stitched along the edges on the base of the tree skirt and then sewed the circles on in alternating colors and patterns. I chose to make smaller circles then the original pattern called for to add more color and depth. Now we have a completely unique Christmas tree skirt that my husband and I both love!


Happy Crafting!

Friday, December 7, 2012

Sock Monkey

My mom has always said that sock monkeys are so ugly that they're cute. Yet she has never had one. Every year when they're out she always comments on them. So this year I decided to make one for her!
I followed the directions from craftpassion.com. The only thing I did differently was sewing the button eyes on first before sewing the white background to the sock. I also added own personal touch by embroidering a heart on the tail.


Happy Crafting!

Friday, October 26, 2012

Bean Bag Toss

Home made bean bags and bean bag toss.... our church is having a Fall Family Festival tomorrow. A good way for our community to have some alternative halloween fun! Each Sunday school class needs to come up with a booth for the event and since my husband and I are teaching kindergarten I wanted a booth that our class could easily participate in.


My inspiration for this project came from Better Homes & Gardens. I wanted something we could easily make ourselves. We took two spare boxes and spray painted them black. Grabbed some craft paper and free handed pumpkins. My husband decided to use his staple gun to attach the pumpkins to the boxes. (What can I say? Men like their tools!) I found the cute halloween material on sale at Walmart and thought it would be PERFECT for the bean bags.


To make the bean bags I measure a 6x6 square and gave them a quick once over with the iron. I sewed the bean bags with wrong sides together with a 1/2 inch seam. Sewing all 4 sides and leaving an opening to turn things right side out as well as insert the beans. After filling the bags with beans I sewed the side with the opening again to make sure everything stayed in place.


I know the bean bag toss isn't perfect but it will definitely serve its purpose and total spent on the project was $3 for the material (don't worry there is still material left over lol) and we already had everything else. Can't beat that!


P.S. I'm thinking of putting it out for my little cousins to play with when we host Thanksgiving at our house this year!
Happy Crafting!


Saturday, September 29, 2012

Swiffer Duster

Due to our square footage upgrade I'm always looking for anything that makes it easier to clean and clean quickly. I found on pinterest that someone took fleece material and made a reusable cover for the swiffer duster and was selling them. I liked the thought of making a reusable one that I can through in the washer and dryer when I'm done. I also thought that I can figure out how to make my own with the spare fleece I've got lying around the craft room. My inspiration


First I took a piece of paper and outlined that shape of the swiffer duster. I then cut about four pieces of the fleece material into the rough shape I wanted for the duster. I took my bottom piece of fleece and put the piece of paper on top of it and sewed it together to get the pattern onto the fleece. After I pulled the paper off of the fleece.


Next I sewed all of the pieces of material together following the pattern I sewed onto the bottom piece. I then put the swiffer into the fleece duster.


Then begin cutting evenly all the way around. 


After the cutting fluff everything and begin dusting!

Happy Crafting!