Showing posts with label Knit Stitch. Show all posts

Sunday, March 29, 2015

Have The Star I See Tonight - Star Garland

Star bright, star light, first star I see tonight. I wish I may, I wish I might, have the star I see tonight.

Many of us know this familiar nursery rhyme. It came to mind as I knit all of these stars.


Together these stars come together in the first garland I've made.
My friends know that I love a challenge and this project was definitely that!
My friend T requested a star garland to decorate for Christmas/New Years. Although, they love it so much they've kept it up ever since it was finished.

While the different stars I found patterns for, the garland portion I came up with my own.... sort of. Depending how long you've been reading my blog, you might remember my knit i-cord tutorial. I've used this i-cord for the garland and I've knit the stars into the i-cord. Using the knitting tails and my tapestry needle I sewed the ends to create a loop. So the garland is ready to hang!


This has been the first of three garlands I've made. I look forward to sharing the others with you. 

If you would like a star garland of your own, they will soon be available in my shop.

Happy Crafting!

Sunday, March 15, 2015

Fixin Stitches

I'm the first to admit that I'm not perfect and nether is my knitting. I do, however, have perfectionist tendencies. If I've made a mistake in the row I'm knitting (or even a few rows back) I'm undo my stitches and fix it. Usually if the mistake is over five rows ago, the mistake stays! As my Mom says "It adds character"!

Today I'm going to share with you some ways that I've found helpful in fixing knitting mistakes...


There are many useful tools to keep in your knitting "toolbox".
Some of the great tools in my collection are a stitch holder
(a wonderful gift, from a wonderful friend!)
and a crochet hook.


A crochet hook is great for reversing a stitch from knit to purl (and vice versa). This was something amazing I discovered while working on a complex pattern. I had made a mistake with a few stitches but did not discover it until I was working on the next row. Because it was only a few stitches I didn't want to undo the row I was working on and half of the previous row to fix a few stitches.

With my previous row on the left needle, my fixed stitch on the stitch holder, and my current row on my left,
I removed a stitch off my left needle and took out the working yarn from the stitch.

Here is a close up view.
On my left needle you can see the first stitch
is currently knit.

After taking out the working yarn, I moved the working yarn in
front of the stitch and using my crochet hook pulled it through to the back
of the loop. The stitch is now purl.
I added it onto my stitch holder and continued correcting stitches.


I have found that this is an awesome way to correct stitches without having to take out an entire row for a few stitches. I hope you find this helpful. Let me know if you have any questions!

Happy Crafting!

Tuesday, July 15, 2014

Diagonal Knit Headband

I was recently approached by Decal Drama because they like my crafts and wanted a craft of mine to feature on one of their mini-giveaways! I've been waiting a few weeks to share this with all of you and I'm excited to say that today is the giveaway starting @ 3 Pacific! Go check out Decal Drama's Facebook page here and my Facebook page here. To enter the mini-giveaway like both of our Facebook pages, like Decal Drama's status and comment on it. It's as simple as that!

I decided to knit a headband because they're so popular right now. If you've read my blog before you know that any recipe or pattern is a jumping off point for me and I make it my own. This headband was no different!

You can find the original pattern here. 

The changes I made:

In section 1, I did not knit the icord and I repeated until I had 21 stitches instead of 29. (If you want to change the width, the number of stitches needs to be divisible by 4 and add 1 because Daisy stitch in section 2A is done in increments of 4 + 1.) 

Because I made the headband narrower in section 2B, row g, K 6, K 9 wrapping 3 times, K 6. (This is to create elongated stitches. Instead of wrapping the yarn around the needle once and knitting, wrap the yarn three times and finish knitting the stitch.)
Row h, P 6, Sl 4 dropping extra wraps, put all 4 stitches back on left needle, slide last 2 stitches over the first 2 stitches, P those 4 stitches, P 1 dropping extra wraps, Sl 4 dropping extra wraps, put all 4 stitches back on left needle, slide last 2 stitches over the first 2 stitches, P 6.
(Insert your needle knit wise into the wrapped stitch, slipping the stitch over to your right needle, dropping the wraps in the process. Do this for 4 stitches, then move them back to your left needle and slipping the last 2 stitches over the first 2 but not off the needle. Purl the 4 unwrapped stitches. Purl 1 dropping the wraps. Slip the last 4 wrapped stitches to your right needle and proceed in the same fashion as the first 4.)

In section 3, I knit 4 rows and knit a buttonhole in the middle of the 5th row and in the middle of the 11th row. I also sewed a coordinating button on section 1 (the first end).


Thank you to my beautiful model Tamara! Go check out her blog here.


Now go to Facebook and enter the giveaway!
Happy Crafting!

Thursday, June 26, 2014

Knit Camera Lens Buddy

I have been waiting and SO excited to share this post with you! I always have a list of things that I want to knit for after I finish whatever I'm currently working on. I've been wanting to make a lens buddy for my good friend T for a long time but every pattern I can find is crocheted. While I've been trying to learn to crochet, I'm not the greatest at it. But I was determined to make this for T's birthday and I'm pleased to say that I made it work!

Here is my tutorial for a knit frog camera lens buddy:

To make your own you'll need:
Circular knitting needles (I used US size 7),
a hair band with no metal,
and green yarn (I used Sugar 'n Cream)
While I have a crochet hook pictured here I didn't need to use it.
To begin make a slipknot around the hair band
and insert the knitting needle into the loop.

Cast on including the hair band.
The key to casting on around the hair band is taking the yarn on the right (the tail) 
and pulling it trough the hair band before casting on each stitch.
This process makes the yarn encircle the hair band.
Here you can see how the yarn is wrapping around the hair band
and the tail is pulled through the band ready to cast on the next stitch.


Towards the end of casting on I had to move the stitches
towards the end of the needle,
moving the yarn further out to cast on and pull tight.
To make it easier to knit I had part of stitches on the needle
and part on the plastic of the circular needle.
Stretching the band during knitting was necessary
as I finished knitting the stitches on the left,
I moved more of the stitches from the plastic up onto the needle.


This was my last row before casting off.
After casting off I used the extra yarn to sew up
where the circle wasn't complete and wove it through
the back side of the entire circle to give it extra strength
so it wasn't so floppy.
Now onto the eyes!


Knit Frog Eyes:
Cast On 5 stitches
Row 1: Knit
Row 2: First stitch (increase) kfb
(knit front and back - after knitting the first stitch, before pushing off,
insert the needle into the back of the same stitch and knit again),
knit to the end of the row
Row 3: Knit
Row 4: Knit to the last stitch, (last stitch increase) kfb
Row 5: Knit
Row 6: First stitch (increase) kfb,
knit to the end of the row
Row 7: Knit
Row 8: Knit
Row 9: Knit
Row 10: Knit cast off
Leave a long tail to attach to the knit circle
Knit a second eye for your froggy.

I decided where I wanted to place one eye,
sewing it into place with the long tail cast off.
To ensure that the second eye is placed in the same location,
fold the circle in half, placing the second eye in the corresponding
location and sew into place.
I took two simple black buttons and sewed them on
with black embroidery floss.

Now the frog is complete!
Your frog is ready to help 
grab babies attention during your next photo shoot!

Happy Crafting!

Thursday, June 19, 2014

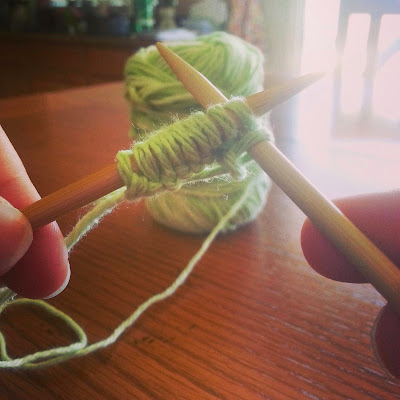
How To Knit : Knit Stitch

Welcome to the second installment of learning how to knit! Here is my tutorial on the knit stitch... one of the basic stitches of knitting. I love to knit... I find it relaxing and I love creating something unique. I hope through my learn to knit series that you might learn to love knitting too!
FYI: I knit left handed so all of my tutorials will done this way 

Some info and tips for knitting:
-The needle with the stitches always goes in your left hand
-The working yarn is held in your dominant hand
- While knitting the stitches will move from the left needle to the right
-After a row is completed the needle with all of the stitches goes back into your left hand
-The tension of the working yarn is key to an even and beautiful stitch
-Practice playing with the yarn and figuring out how you like to hold it
(I find it best to hold it in the same way to maintain the same yarn tension)


So here are is my knitting needle with 10 stitches cast on.
Find a refresher on how to cast on here.


Insert the knitting needle under the first stitch from front to back.


Wrapping your working yarn (attached to the ball) in a clockwise motion around the needle.


Move the needle in your right hand back through the stitch....


so that the working yarn you wrapped around the needle remains.
Push this stitch off the left needle and you've completed your first knit stitch!


The second is the same as the first. Insert the needle...


 wrap the working yarn clockwise...


pull back through and push off.


Here is the row completed.
This is what the knit stitch looks like (little v's).
In knitting patterns this is known as the right side (RS).


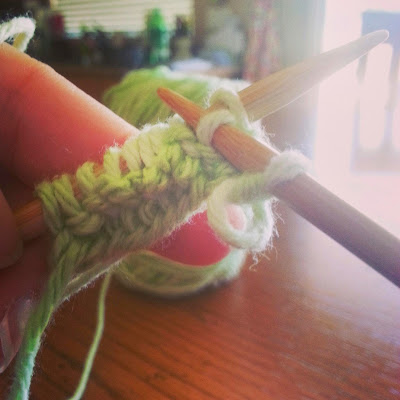
This is what the back side looks like... the wrong side (WS).


Now for the second row!  Done in the same fashion as the first.
Inserting the needle...


wrapping the yarn clockwise...


pulling the needle back through...


and pushing it off the left needle.


Insert the needle from front to back.


Wrap the yarn clockwise.


Pull the needle back through and push it off the needle.


Second row complete!


With the knit stitch the side facing you while knitting will look like v's and the back side will look like bumps.
In knitting terms knits and purls. Knitting every row (like I've done in the tutorial) is known as Garter Stitch.

Happy Crafting (and knitting)!

Wednesday, December 4, 2013

Basket Weave Scarf: Scarves for Christmas

This scarf was a bit hard to find a pattern for. I have a strict rule (so far) that I won't pay for a knitting pattern. I will keep searching the internet until I find one similar or a different one that I like that's free. I had found a scarf pattern similar to this but it was $10 for the pattern. So I started on a hunt for a pattern for N's scarf. I remembered a baby blanket pattern that I had pinned previously on pinterest. It is a basket weave pattern blanket that I adapted into a scarf. I LOVE the way it turned out. I keep telling my husband with each scarf I knit how much I love the scarf and I hope that those that receive the scarf will love it even a quarter as much as I do!

The scarf has a border of seed stitch (six rows on the bottom with three stitches on each side). The basket weave is done in increments of six and I did the scarf twenty four stitches across (so it is still divisible by six and works with the pattern). The seed stitch border is shown below in bold.

K P K  P K P K P K P K P K P K P K P K P K  P K P
P K P  K P K P K P K P K P K P K P K P K P  K P K 
K P K  P K P K P K P K P K P K P K P K P K  P K P
P K P  K K K K K K P P P P P P K K K K K K  K P K
K P K  K K K K K K P P P P P P K K K K K K  P K P
P K P  K K K K K K P P P P P P K K K K K K  K P K
K P K  K K K K K K P P P P P P K K K K K K  P K P
P K P  K K K K K K P P P P P P K K K K K K  K P K 
K P K  K K K K K K P P P P P P K K K K K K  P K P
P K P  P P P P P P K K K K K K P P P P P P  K P K
K P K  P P P P P P K K K K K K P P P P P P  P K P
P K P  P P P P P P K K K K K K P P P P P P  K P K
K P K  P P P P P P K K K K K K P P P P P P  P K P
P K P  P P P P P P K K K K K K P P P P P P  K P K 
K P K  P P P P P P K K K K K K P P P P P P  P K P

P K P  K K K K K K P P P P P P K K K K K K  K P K
K P K  K K K K K K P P P P P P K K K K K K  P K P
P K P  K K K K K K P P P P P P K K K K K K  K P K
K P K  K K K K K K P P P P P P K K K K K K  P K P
P K P  K K K K K K P P P P P P K K K K K K  K P K 
K P K  K K K K K K P P P P P P K K K K K K  P K P 

(Follow this pattern until your desired length. Finishing with the seed stitch border.)


P K P  K P K P K P K P K P K P K P K P K P  K P K 
K P K  P K P K P K P K P K P K P K P K P K  P K P
P K P  K P K P K P K P K P K P K P K P K P  K P K 

I have come to the conclusion that I love multi-color yarn and the pattern that it creates within the pattern!

A close up: basket weave is alternating blocks of knits and purls.

I loved the look of this scarf so much that it is the background for my CraftyRDH Facebook page. I would greatly appreciate it if you all would follow my blog and like my Facebook page.
Happy Crafting!

Saturday, November 2, 2013

Knit Flower Pendant

For orange day tomorrow I have knit myself a flower pendant. Knitting the petals individually. I wanted my flower a bit smaller so I eliminated rows 6-10. Joining the petals together and adding a small button in the middle for pizzazz. Just add a pin to the to the back.

This knitting project has great possibilities. The color possibilities are endless with a button or jewel as simple or as ornate as you like!

I found this great knitting pattern here. I love the way it turned out and can't wait to make some of these for Christmas gifts!
Individual flower petal
All put together
A little embellishment goes a long way!
Happy Crafting!

Saturday, October 12, 2013

Knitting Nemo

If you remember from last year my husband and I teach Sunday school, Kindergarten to be exact. We have a color day each semester, where we all dress to the max in the appropriate color and celebrate how much Jesus loves us. The kids are encouraged to bring friends. It's a great way to have fun with the kids and reinforce that Jesus loves us. The class that has the most of the color per student wins a prize. In the Fall our color day is orange and in the Spring our color is red.

Last year when we had orange day we weren't aware of how competitive this can be and weren't prepared. So to prepare for red day I knit red hearts for the girls and red fish for the boys. To prepare for orange day this year I'm knitting Nemo (orange fish) for the kids.


I'm trying out smaller needles this time around 4.5 mm instead of 6 mm. Because of the needle size difference I had  to adjust my original pattern. You can find my original pattern here.


My adjusted pattern: Cast on 1 Row 1: knit 1 Row 2: knit 1 make 2 Row 3: knit 1 make 1, knit 1, knit 1 make 1 Row 4-9: knit across Row 10: knit 2 together, knit 1, knit 2 together Row 11: knit across Row 12: knit 2 together, knit 1 Row 13: knit across Row 14: knit 1 make 1, knit 1 Row 15 : knit 1 make 1, knit 1, knit 1 make 1Row 16: knit across Cast off


Here is a chart for the little fish:

X
XX
XXXXX
XXXXX
XXXXX
XXXXX
XXXXX
XXXXX
XXXXX
XXX
XXX
XX
XX
XXX
XXXXX
XXXXX


Thursday, June 6, 2013

Baby blankets

My fingers have been so busy knitting I haven't had time to post! Since I've last updated my blog I have finished my second baby blanket and I'm close to finishing my third! The pictures below are of my second blanket. It is for my cousin who is do this fall. For this blanket I used the same pattern that I did for Peter's blanket. You can find the pattern in my previous post here.


I love the colors in this yarn... great for a baby but not pastels!

I'm finding that I really like the "pattern" the multi-color yarn makes!
Happy Crafting!